Transfer Application

This page has been published to give advice and guidance to those customers using our transfers

Scroll down the page or click on a 'link' below:

METHODS TO REMOVE PRINTED IMAGES & NUMBERS

WATERSLIDE & RUB-ON ('STANDARD' OR COLOUR) TRANSFER APPLICATION

WATERSLIDE & RUB-ON TRANSFER EXAMPLES
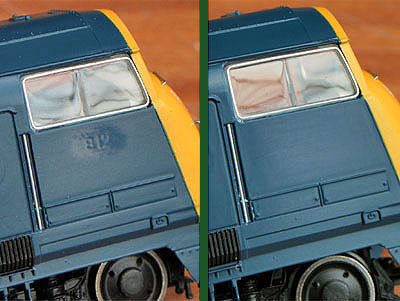


INTRODUCTIONREMOVAL

Customers who purchase our waterslide and rub-on transfers often ask us: “What’s the best way to remove numbers?” Regrettably, our answer is: “There isn’t one.” The ‘tampo’ printing process employed by model railway manufacturers today is intended to apply a PERMANENT image. We employ the same process to print details and numbers onto our coaching stock at our U.K factory. In our experience the printed ink will ‘dry’ within less than a minute of contact. Over time (approximately a fortnight) the ink creates an indelible bond with the applied surface.

Those modellers wishing to re-number / swap BR Crests etc. face a potentially gruelling task as this ‘lasting’ quality of ink is far more resistant than, say, fifteen to twenty years ago when you could remove most printed images from models with a piece of sellotape!

What we will demonstrate here is a selection of proven methods to remove printed ink and therefore allow modellers the opportunity to customise their models.


METHODS TO REMOVE PRINTED IMAGES & NUMBERS

When we tell customers “There isn’t one”, we mean exactly that – there are in fact MANY ways to remove printed ink. Each way or method will have its advantages / disadvantages and will also suit each modeller differently. We have explored the more ‘common’ methods of ink removal and these are detailed below.

If you are not planning a repaint, there are a couple of points to keep in mind before you start to remove the printed images:

1) Once the ink has been removed, the 'area of removal’ should ideally match the paint ‘finish’ of the model: depending on where it’s manufactured each model will have a ‘finish’. Please review these 'OO' gauge manufacturers and decide for yourself, though as a 'rule of thumb' we believe that: Bachmann Europe models have a matt-satin paint finish; Hornby models have a satin paint finish; Heljan models have a satin-gloss paint finish. The finish of your model may also help you decide upon which method(s) to use to remove the ink. An example of where this may prove to be a problem: removing larger images (such as a BR Crest from a tender) would have a more pronounced area of removal if the paint finish has not been matched.

2) When using certain methods to remove numbers or images there is a chance that a noticeable ‘ridge’ or ‘witness line’ is left around the edge of where the ink was printed. An example of where this may prove to be a problem: BR Blue TOPS Class 47 locomotive – to remove the number and replace it with a pre-TOPS four digit diesel number – providing that you use the correct spacing the witness lines of two partial numbers may be visible on either side of your new transfer numbers. However it is possible for this issue to be rectified - please see the Fine 'Emery' Board / Sanding Sticks section.

T-Cut

Can be purchased in most automotive parts specialists or from a supermarket. Advantages to using this method: very fine abrasive quality (will not damage your model’s paint work); removes ink very quickly; good for removing large images. Disadvantages: the ‘paste’ can get into grills / grooves; requires the model to be washed off and dried before applying transfers; use results in a high gloss finish.

T-CUT

IN USE: Apply the T-Cut paste sparsely over the ink to be removed. Use a cotton bud to gently rub the paste back and forth over the ink. Try to keep within the confines of the image especially if there is detail nearby that you do not want to remove! Wipe off the residual paste with a moist cloth and dry the area thoroughly.

PLEASE NOTE: STUDY AND ADHERE TO THE MANUFACTURER'S GUIDELINES AND SAFETY INFORMATION WHEN APPLYING T-CUT.

Wooden Cocktail Stick

Advantages to using this method: inexpensive; very fine abrasive quality (will not damage your model’s paint work); excellent for removing ink from gloss-finish models. Disadvantages: accuracy is not always assured as the tip of the stick will wear down with little use; a lot of time is needed to remove the ink; not suited for larger images; use results in a glossy finish.

COCKTAIL

IN USE: Use the cocktail stick to rub back and forth over the ink. Try to keep within the confines of the image especially if there is detail near that you do not want to remove! Reassess the tip of the cocktail stick as this will wear down during use.

Glass Fibre Pencil

Available to purchase from modelling or electronics specialists. Advantages to using this method: removes ink very quickly; can be used to remove detailed and large images. Disadvantages: high abrasive quality; use results in a flat matt finish; danger of glass fibre splinters in fingers!

GLASS_FIBRE

IN USE: Gently ‘sweep’ the glass fibre pencil back and forth over the ink. Do not press down too hard on the surface of the model. Try to keep within the confines of the image especially if there is detail nearby that you do not want to remove! Try to prevent injury from glass fibre splinters by wearing protective gloves and avoiding the unconscious ‘wipe away’ of ink / image residue from the model and / or work area.

PLEASE NOTE: CARE MUST BE TAKEN WHEN USING MODELLING TOOLS AND CRAFT KNIVES AS THESE CAN CAUSE PERSONAL INJURY.

Scalpel Blade

Advantages to using this method: precision; modeller’s own choice of blade styles and sizes. Disadvantages: optimum skill and co-ordination needed; potential damage to the model can be irreversible; use may result in a flat matt finish; not suited for removing large images.

SCAPEL

IN USE: To be used when removing small details or numbers. Gently ‘sweep’ the tip of the scalpel blade back and forth over the ink. Do not press down too hard on the surface of the model. Try to keep within the confines of the image.

PLEASE NOTE: CARE MUST BE TAKEN WHEN USING MODELLING TOOLS AND CRAFT KNIVES AS THESE CAN CAUSE PERSONAL INJURY.

Fine ‘Emery Board’ / Sanding SticksSAND_2

Available from modelling specialists (see also your wife / girlfriend). Advantages to using this method: many different ‘grades’ can be sourced which allows the modeller to choose suitability for project – medium coarse grades produce a matt finish, super fine grades produce a gloss finish; removes ink quickly; good for removing large images. Disadvantages: finer grades can be very expensive; may be difficult to find a ‘grade’ that will match exactly to the paint finish of your model; size and shape may not allow for detailed ink removal.

We recommend that emery boards / sanding sticks should not be used as an exclusive form of ink removal as there is a chance that they will quickly 'clog' up with the removed ink. First choose a method of ink removal listed above and 'finish off' with an emery board / sanding stick. Emery boards / sanding sticks are excellent for 'balancing' the finish of the model - see images below of a Class 42 and a 9F. On both models the ink was first removed with T-Cut (note the prominent ridges / witness lines indicating where the ink was removed) and then a fine grade sanding stick was used to balance the area of ink removal.

INK_RIDGE_42INK_RIDGE_9F

IN USE: Use the emery board to rub back and forth over the area of ink removal. Review your action to establish that you are using the correct (or at least the closest) ‘grade’ that will match with your model’s paint finish. Try to keep within the confines of the image especially if there is detail nearby that you do not want to remove!


SO WHY NOT 'HAVE A GO' YOURSELF?

The application of transfer images should not be restricted to re-sprays or kit-builds – why not purchase any inexpensive (and preferably Chinese-made) railway model produced within the last ten years and just have a go at removing the printed numbers and images? You can trial the methods of ink removal listed here as well as some of the numerous other methods that individual modellers ‘swear by’: we've been assured that there are many web forum topics on this subject!

Of course another option for modellers is to petition their appropriate manufacturer(s) to produce a small percentage of un-numbered / un-logo’ed versions of their production models – well, we can live in hope..!


TRANSFER APPLICATION

We are happy to be able to offer our advice and assistance to anyone using our transfer images. If you do have any questions or problems concerning transfer application – please contact us by telephone or by e-mail.


WATERSLIDE TRANSFER APPLICATION

Waterslide transfer images will adhere better to a gloss surface. To achieve an ‘even’ finish (a balance of gloss waterslide image to paintwork) it is recommended, though not essential, to first apply gloss varnish to your model.

Take the desired image and cut it from the transfer sheet. After soaking the image for a few seconds in lukewarm water - slide the transfer image off the backing paper using a moist paintbrush and adjust to the required position.

Carefully blot dry the excess water from around the transfer image with a tissue.
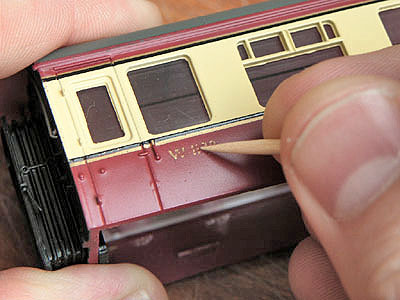
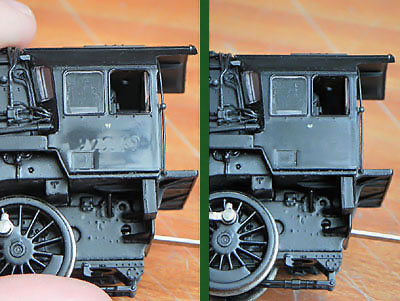
FOR ADDITIONAL REFERENCE - SHOWN RIGHT IS A FIVE-PART SLIDESHOW ILLUSTRATING THE WATERSLIDE TRANSFER APPLICATION PROCESS.

Note: the model is a tender bodyshell for a B1 Locomotive and the image applied is a 'large' crest from Replica Railways waterslide transfer sheet 41038. In this example the tender did not receive a coat of gloss varnish before the transfer was applied.


PLEASE NOTE: CARE MUST BE TAKEN WHEN USING MODELLING TOOLS AND CRAFT KNIVES AS THESE CAN CAUSE PERSONAL INJURY.

WS


RUB-ON DRY TRANSFER APPLICATION

You will need a suitable tool to separate the image from the transfer sheet, for this example we have used a cocktail stick. We would also recommend using a pencil or a ballpoint pen that’s run out of ink.

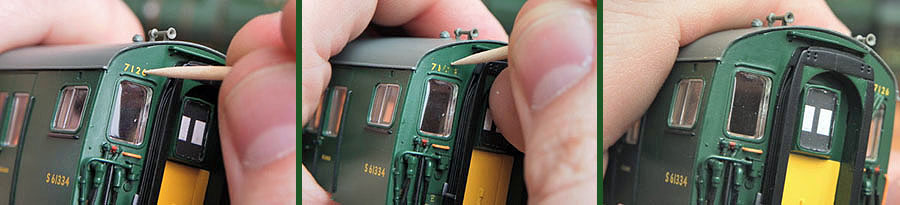
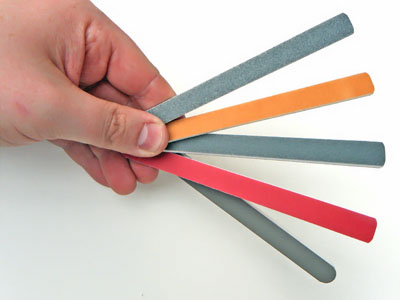
Once you have ensured that the area you have chosen to place the transfer image is clean and free of dust, remove the transfer sheet and tissue paper from the packaging.

On a flat surface, place the tissue paper under the transfer sheet and using your chosen tool, GENTLY and EVENLY rub over your required image. The image should now appear less vivid or slightly translucent.

Your image is now ready to be placed on your model. Remove the transfer sheet from the tissue paper and move your required image into position on your model. Again, using your chosen tool, rub GENTLY and EVENLY over the image – pay attention and try to keep within the extents of the image as pressure on your model may result in the buffing/shining of the paintwork.

If you make a mistake when applying your transfer image, simply remove the unwanted image by scraping gently with a lightly-abrasive material – using a wooden cocktail stick works well or alternatively you can remove the image using your fingernail.

FOR ADDITIONAL REFERENCE - SHOWN RIGHT IS A SIX-PART SLIDESHOW ILLUSTRATING THE RUB-ON DRY TRANSFER APPLICATION PROCESS.

Note: the model shown is a Bachmann Class 42 and the images applied are from Replica Railways rub-on transfer sheet RTDP20. Numbers were removed individually from the transfer sheet to make up the desired running number.

RO

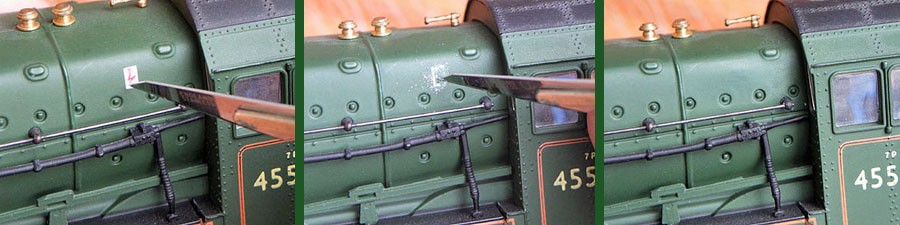
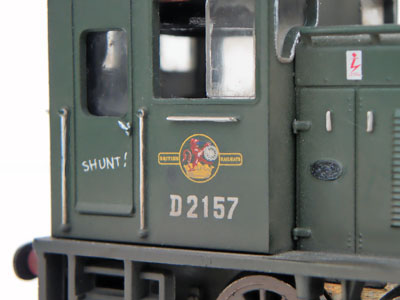
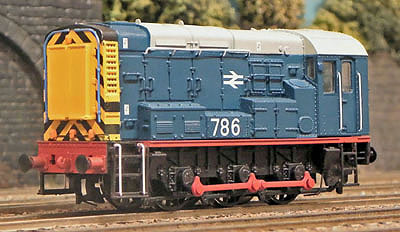
FOR THOSE WHO'VE NOTICED: THESE IMAGES WERE TAKEN BEFORE BACHMANN'S ANNOUNCEMENT TO PRODUCE THIS PARTICULAR LOCOMOTIVE (32-056DC) - SO THIS MODEL OF 'KELLY' HAS SINCE BEEN STRIPPED AND WILL NOW RE-APPEAR AS A GREEN WITH HALF YELLOW LIVERIED 'CHAMPION' WITH TRI-CODE INDICATOR PANEL...


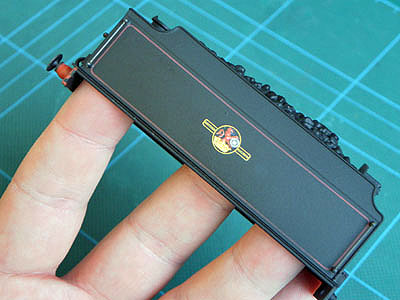
RUB-ON DRY TRANSFER (COLOUR) APPLICATION

NB: APPLICATION OF ‘COLOUR’ DECALS DIFFERS FROM OUR STANDARD ‘WHITE’ OR ‘BLACK’ RUB-ON DECALS

You will need a suitable tool to separate the image from the transfer sheet – the material composition of the tool should not be too hard. For this example we have used a cocktail stick. We would also recommend using a soft graphite pencil.

Ensure that the area you have chosen to place the transfer image is clean and free of dust. Remove the transfer sheet and tissue paper from the packaging.

The transfer sheet carrier film is not as pliable as that of our Black or White rub-on numbers. We recommend that you cut the transfer carrier film into smaller sections to aid accurate positioning. Please be aware that the carrier film may distort the image if not positioned evenly and held in place during application – ensure that you cut the sheet into sections large enough for you to handle.

Position the transfer sheet on your model and using your chosen tool, GENTLY and EVENLY rub over your required image. The image should now appear less vivid or slightly translucent. Try to keep within the extents of the image as unwanted adhesive from the transfer sheet may be transferred on to your model.

Next, take the sheet of tissue paper and place over the applied transfer image. Again, using your chosen tool, rub GENTLY and EVENLY over the image – this will ensure better adhesion between the image and your model.

If you make a mistake during application, simply remove the unwanted image by scraping gently with a lightly-abrasive material – using a wooden cocktail stick works well. Try to avoid ‘spreading’ the unwanted image when trying to remove it – short strokes to remove a small amount then clean tool (repeat as needed).

FOR ADDITIONAL REFERENCE - SHOWN RIGHT IS A FIVE-PART SLIDESHOW ILLUSTRATING THE RUB-ON COLOUR DRY TRANSFER APPLICATION PROCESS.

Note: the model shown is a Bachmann 9F and the images applied are from Replica Railways colour rub-on transfer sheet RTDP26. Numbers were removed individually from the transfer sheet to make up the desired running number.

ROC


Finishing Your Model

To finish your model we recommend that you apply a coat of varnish for complete protection of any transfer image. Applying varnish will help you level the surface of your model for weathering (see below). If you have previously applied gloss varnish and then used waterslide decals, you may wish to now apply a coat of matt or satin varnish - once the transfer image and area have been allowed to dry fully.

It is not essential to apply varnish if you are keeping your model in its ‘pristine’ condition and that you are not actively handling it on a regular basis.

Note: you can see from the image on the right how a layer of varnish can significantly improve the appearance of a waterslide transfer. The varnish will 'balance' the difference between the high gloss sheen of the waterslide transfer image and the satin finish of the model. Sometimes, it can be well worth this 'extra' effort to achieve a finish you can truly be proud of - it was just bad luck that a speck of dust landed on this particular model whilst the varnish was drying..!

VARNISH


A Note On 'Weathering'...

If you are planning to use weathering products over transfers you have applied, we recommend that you first apply a coat of varnish to your model to level the height between the transfer image(s) and paintwork.

N.B: Failure to apply a 'protective' layer may result in transfer images being accidentally removed when applying weathering powders, dry-brushing or applying water-based paint. Techniques such as dry-brushing may also highlight the edges of the transfer images by default that they are irregular to the body side (like a rivet, door line, grill etc.) and a build up of weathering materials may then surround your applied images.

Note: the model shown is a Replica Railways 03 Shunter re-numbered with individual rub-on numbers from RTDP01 and a 'small' crest image taken from waterslide transfer sheet 41038.

03_WTD


EXAMPLES OF WATERSLIDE & RUB-ON TRANSFER APPLICATIONS

Shown below are just a few examples of Replica Railways transfers applied to various models.

CL08 RO_EX_3
Bachmann Class 08 Shunter re-paint (Thornaby)
Re-liveried using Replica Railways waterslide and rub-on transfers

MODEL SHOWN COURTESY OF N. CROMBIE
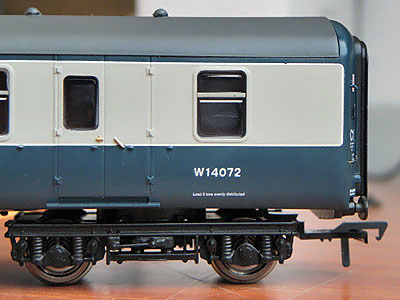
Bachmann MK2a Coach re-numbered with numbers from
Replica Railways rub-on transfer sheet RTDP08
CL37s
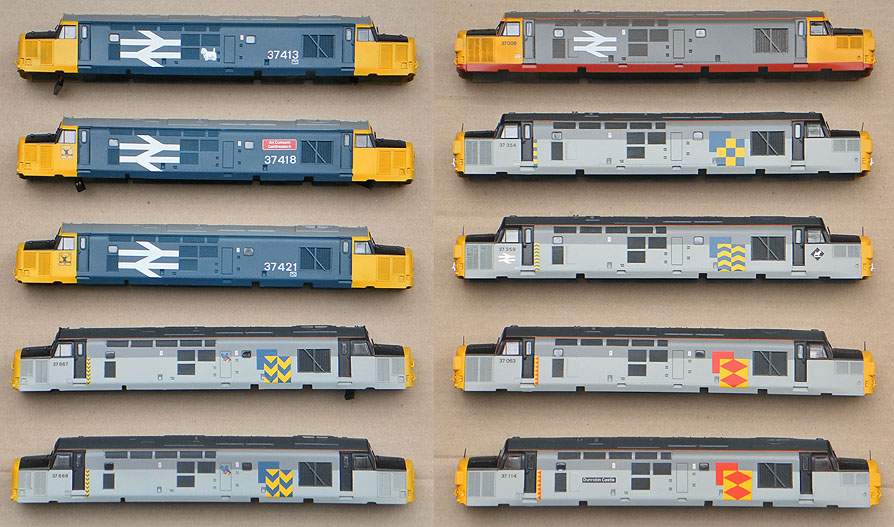
A selection of Bachmann Class 37s bodyshell re-paints - re-liveried using Replica Railways waterslide and rub-on transfers

MODELS SHOWN COURTESY OF N. CROMBIE
PR_TR_1 PR_TR_2
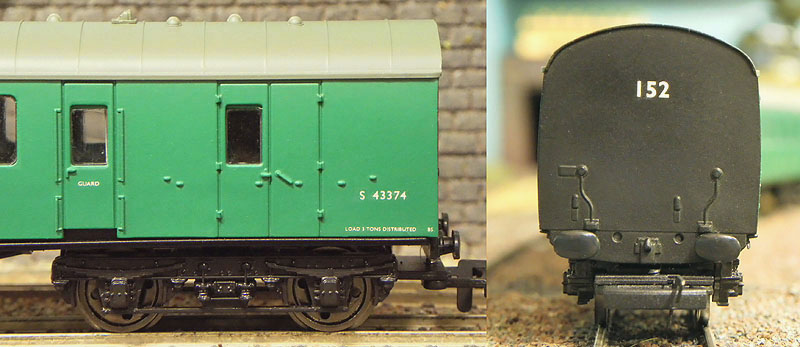
Replica Railways Suburban Brake Second Coach with numbers from Replica Railways rub-on colour transfer sheet RTDP23.
One coach has the transfer images applied, the other coach has the numbers printed on (from 3-car set 12591) - can you spot the differences?
RO_EX_2 RO_EX_1
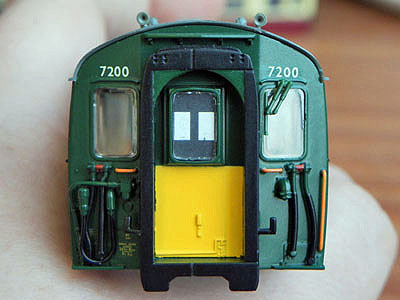
Bachmann 4CEP Motor Driving Coach re-numbered with numbers
from Replica Railways rub-on transfer sheet RTDP28
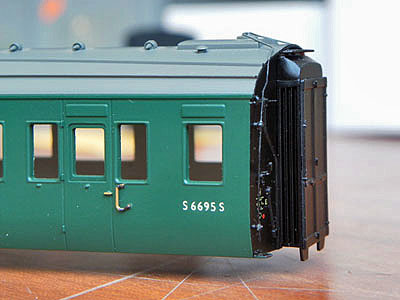
Hornby Maunsell Coach re-numbered with numbers from
Replica Railways rub-on transfer sheet RTDP28 (pull-push project)

If you have any questions concerning the contents on this page please e-mail us at This email address is being protected from spambots. You need JavaScript enabled to view it..